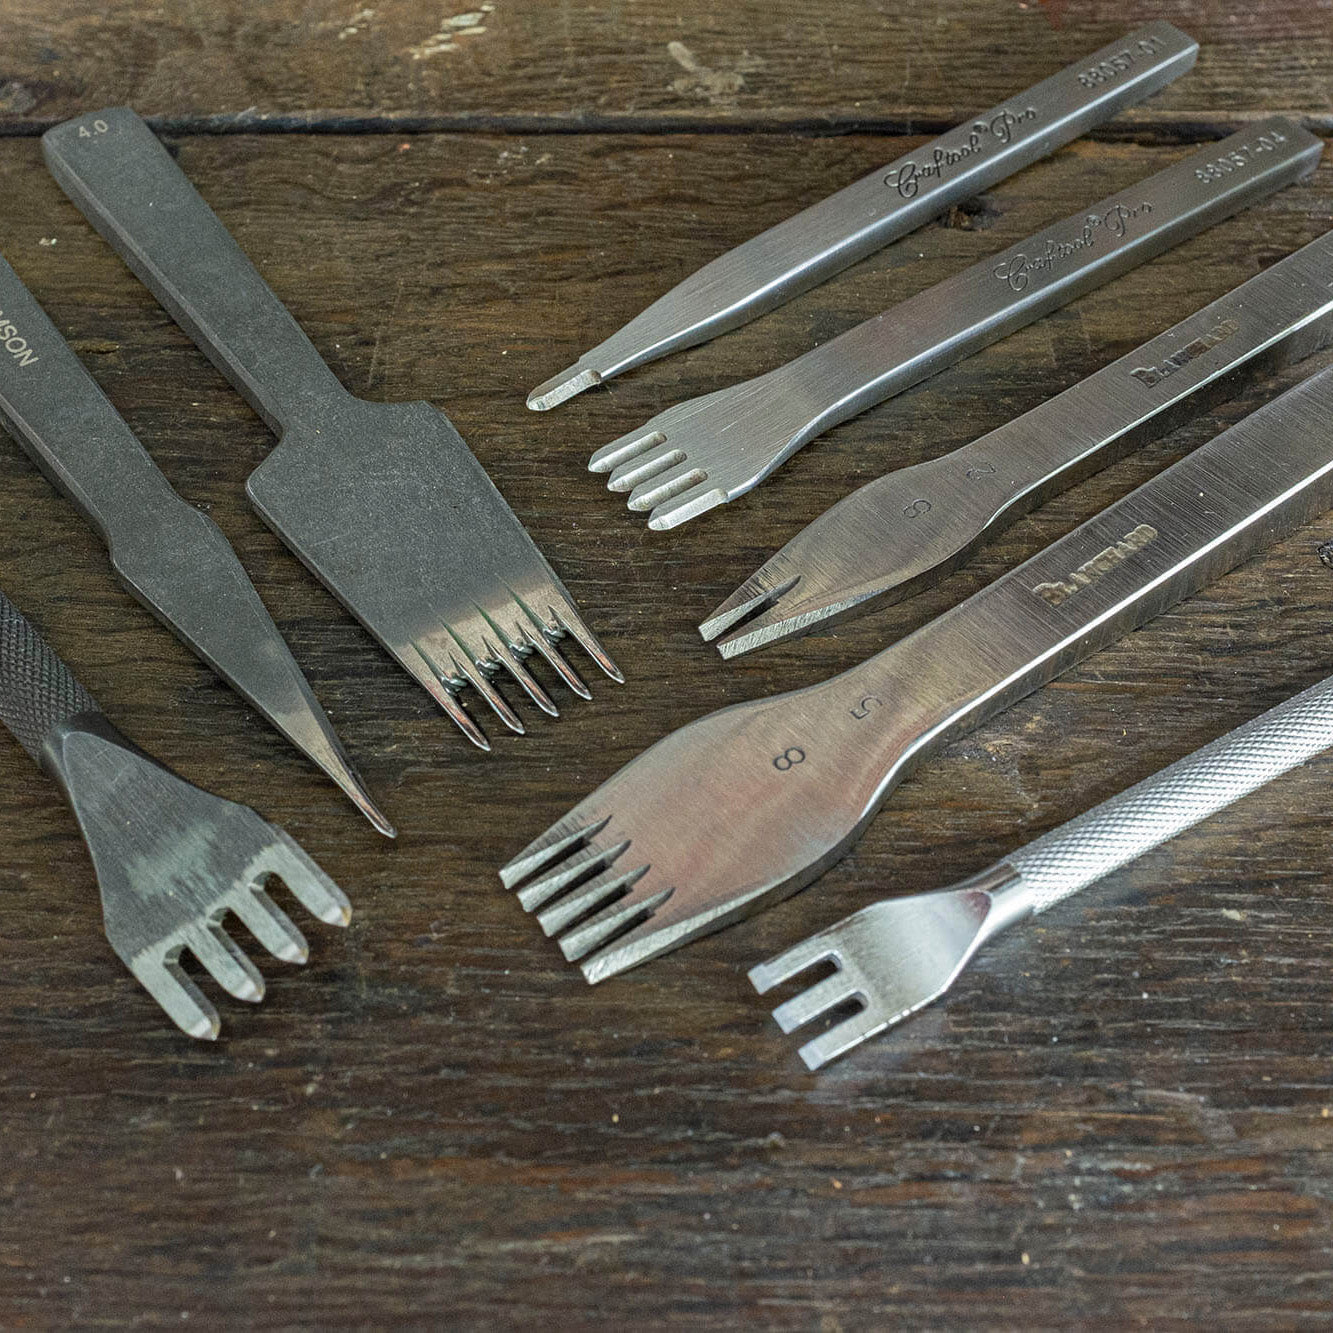
Pricking iron? Chisel? Looking for the perfect stitch.
Every craftsman or leatherworker wants a clean stitch. My search for the perfect tool started a while ago and every time I thought I had found the tool for me. The advantage of today is that we can find hundreds of videos and articles about this subject but does that work for you? It is a personal discovery based on skills and you will need a lot of practice.
I will share my personal search for the stitching iron that suits me best.
My first tool was a straight chisel nr. 2 with a distance of 2mm in between.
I was very pleased with it and it gave me a far better stitching result then I was used too. I used a thicker waxed thread then.
Reading articles and looking at other craftsmen I really like the angled stitching pattern made by a diamond chisel. I ordered this one at leathercraft.jp (links at the end of this blogpost) With a width of 3.55mm per tooth, it has a wide stitching pattern of 5mm and was suitable for a thicker thread.
Making smaller leatherwork like watch straps, I needed a smaller chisel. Therefore I bought the Tandy Leather Craftool Pro 88057-04 and 88057-01.
A 3.5mm diamond chisel, a great tool with a nice stitching pattern especially when you use a thinner thread. 
This one was really an investment. My research wasn't that thorough so I used it totally wrong. As heard and read many times: 'They look great on your Instagram!' The Blancard is not a chisel but a pricking iron, which means you don't punch the iron through the leather, but you make a mark and use an awl to punch through the leather and make a nice clean stitching hole. In the first part, the marking is not that difficult but using the awl and make sure you got consistent stitching on the back of your leatherwork requires hours of practicing.
I used the iron totally wrong and punched it through the leather as a chisel. When your work is not that thick it seems to work fine and actually it turned out well.
But with my needs to improve the stitching quality in the meantime, I found these tools at Crimsonhides. I bought the whole 4mm set and these Japanese style irons are made to punch through the leather layers, made from DC53 steel. The antique finish gives a firm grip. The slim diamond-shaped teeth are very sharp and they create smaller and refined holes. In combination with the Crimsonhides thread, I found the perfect combination for my leatherwork to finish handstitched.

Here is an overview of the different stitching irons and there stitching patterns.
I stitched al samples with 2 threads in different thicknesses: a 0.5 and 0.6 thread from Crimsonhides using a harness needle nr. 3. 
The stitched result and the used stitching irons.
There is a lot to say about the stitching tools available but it's on you and your own experience what you prefer.
If you want more info I have a few interesting links here:
- Nigel Armitage, one of my favorite craftsmen https://www.armitageleather.com/
Here you can find a very complete review of Stitching irons
- Crimsonhides https://crimsonhides.com/
- Make Supply https://makesupply-leather.com/reviews/review-crimson-leather-pricking-irons/
- Tandy Leather https://www.tandyleather.com/en/product/craftool-fine-diamond-chisel-3-5-mm
- Leathercraft Japan https://www.leathercraft.jp/
- Fine Leatherworking https://www.fineleatherworking.com/blog/using-pricking-irons/